20 Parts Of A Sewing Machine: Easy to Learn
As you pull out your new sewing machine, you may be asking yourself the question of what are the parts of a sewing machine and how do you use them?
We have you covered and will have you confident using your new sewing machine.
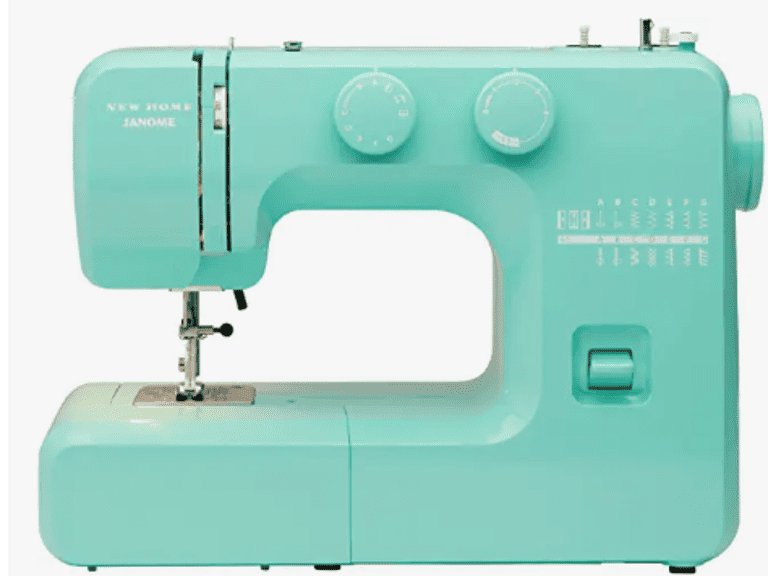
Let’s start with commonly used things on modern sewing machines and move forward. We will cover all the pieces. We are using a Singer sewing machine as an example, so your machine may vary a little.
It’s always a good idea to read your sewing manual to see all the sewing machine parts specific to your brand as different brands can put the bobbin casing in a different location.
Table of Contents
Sewing Machine Parts
Once you learn all the parts of a sewing machine, make sure and check out our sewing classes.
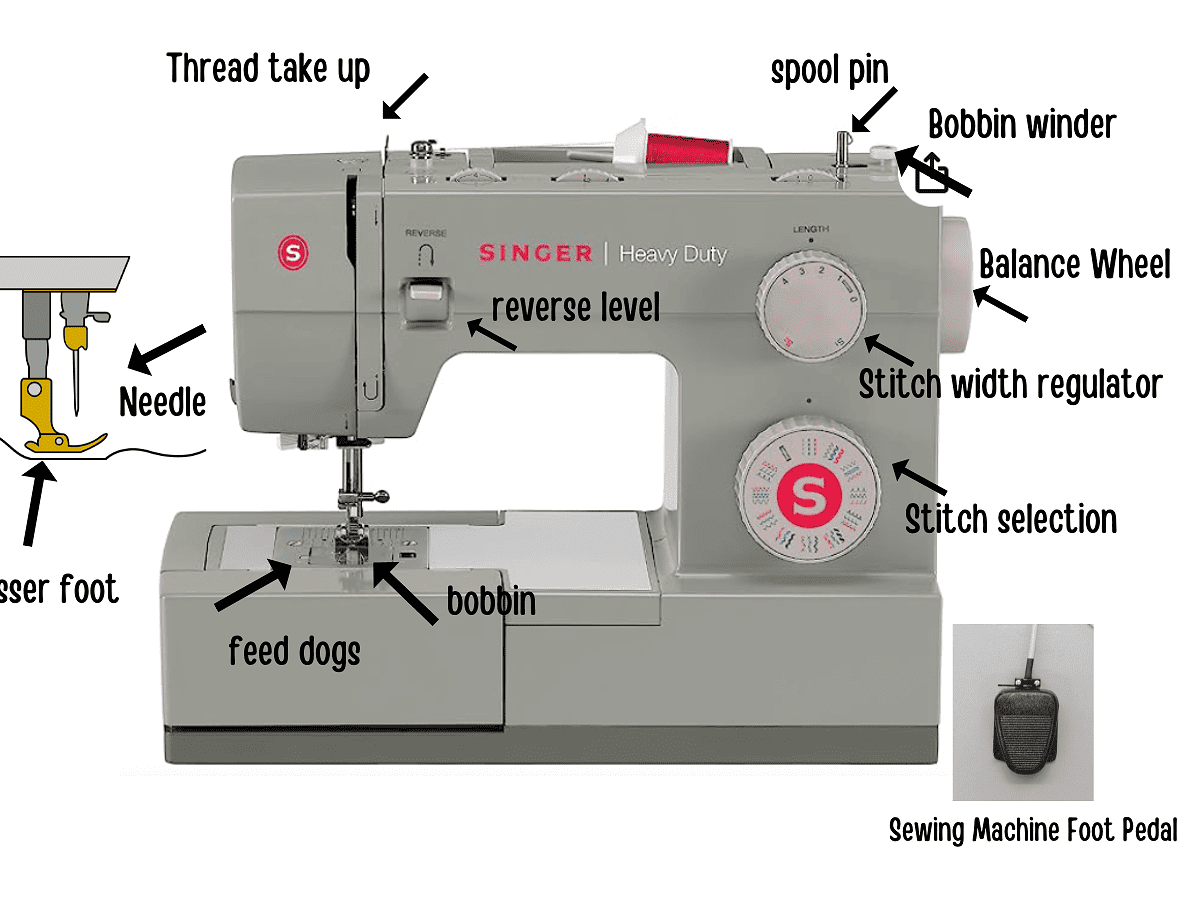
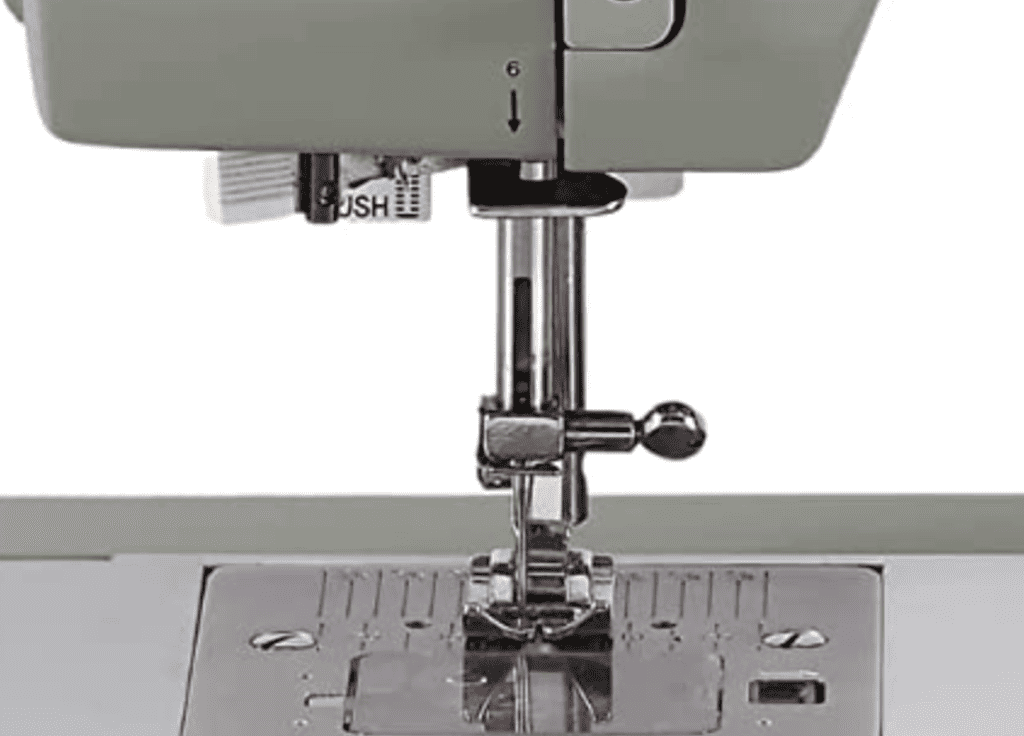
Presser Foot
The presser foot is an essential component of a sewing machine, responsible for firmly pressing and securing the fabric against the feed dog during the sewing process, ensuring stability and smooth stitching.
To control this function, your sewing machine will have a lever, though its exact location may vary depending on the brand of the machine.
For most sewing machine brands, you can find the presser foot lever at the back of the machine. This lever can be moved up and down, allowing you to easily slide fabric under the presser foot when you’re ready to sew and lift it up when you’ve finished sewing.
One of the remarkable aspects of the presser foot is its versatility, as there is a diverse range of types available, each designed for specific sewing purposes.
Among the common examples are the zipper foot, which facilitates sewing zippers neatly, the satin foot, ideal for working with delicate and slippery fabrics, and the buttonhole foot, which aids in creating precise buttonholes.
When you need to switch to a different presser foot, there’s a small screw located at the back of your machine on the left side. Look at your learning the parts of a sewing machine.
By adjusting this screw, you can release the current presser foot and easily replace it with the one required for your next sewing task, allowing you to adapt the machine to various stitching needs.
Thread Cutter
A thread cutter is an essential tool found in traditional sewing machines, typically crafted as a small, flat piece made of either metal or plastic.
Positioned beneath the needle plate, it plays a crucial role in providing easy access to the needle and bobbin threads, as well as the outer rotating hook and inner bobbin case.
This compact yet indispensable component serves multiple functions that streamline the sewing process.
Firstly, it allows for the efficient trimming of both the needle and bobbin threads, enabling swift and precise cutting without the need for additional scissors or thread snippers. This convenient feature helps save time and enhances overall sewing efficiency.
Furthermore, learning this parts of a sewing machine will make sewing easier.
Additionally, the thread cutter facilitates seamless thread management, ensuring a smooth and uninterrupted sewing experience.
By keeping the threads neatly trimmed, it minimizes the risk of thread tangling or becoming entangled in the machine’s moving parts, promoting hassle-free stitching.
The positioning of the thread cutter beneath the needle plate ensures it remains easily accessible, yet discreetly tucked away to avoid interference during sewing. This placement ensures that the threads are conveniently within reach, allowing the sewer to continue their work with ease.
Whether you are working on basic sewing projects or intricate designs, the thread cutter proves to be a valuable asset, contributing to the overall functionality and user-friendly nature of traditional sewing machines.
Its simple yet effective design reflects the thoughtful engineering that enhances the sewing experience and empowers creators of all skill levels to bring their creative visions to life.
You are doing a great job learning the parts of a sewing machine. You are going to be ready to sew soon.
Feed Dogs
The metal plate, commonly known as the throat plate, plays a pivotal role in guiding and manipulating the fabric during the sewing process. Positioned under the needle, it contains teeth-like metal protrusions that work in tandem with the feed dog mechanism.
When the sewing machine is in operation, the feed dog mechanism rises and engages with the fabric, firmly gripping it and gently pushing it backward. This controlled movement ensures a consistent and even feed of the material, allowing for precise stitching.
However, certain sewing tasks may require adjustments to this mechanism. For instance, when sewing buttons or working with thicker fabrics, you might need to lower the teeth of the feed dog to prevent them from interfering with the fabric’s smooth movement.
Lowering the teeth facilitates manual fabric manipulation and provides more control in handling specialized sewing techniques.
On the other hand, for regular sewing projects, it is generally advisable to keep the feed dog mechanism raised. This ensures that the fabric is automatically fed under the needle at a steady pace, making it easier to achieve neat and uniform stitches.
To make adjustments to the feed dog mechanism, consult your sewing machine’s user manual for specific instructions. The configuration switch or lever for raising or lowering the feed dog may vary depending on the model and brand of your sewing machine.
Familiarizing yourself with the manual will help you navigate the process effortlessly and maximize the full potential of your machine for various sewing endeavors. It’s essential in learning the parts of a sewing machine.
Properly utilizing the feed dog mechanism enhances your sewing experience and empowers you to tackle a wide range of projects with precision and confidence.
Needle
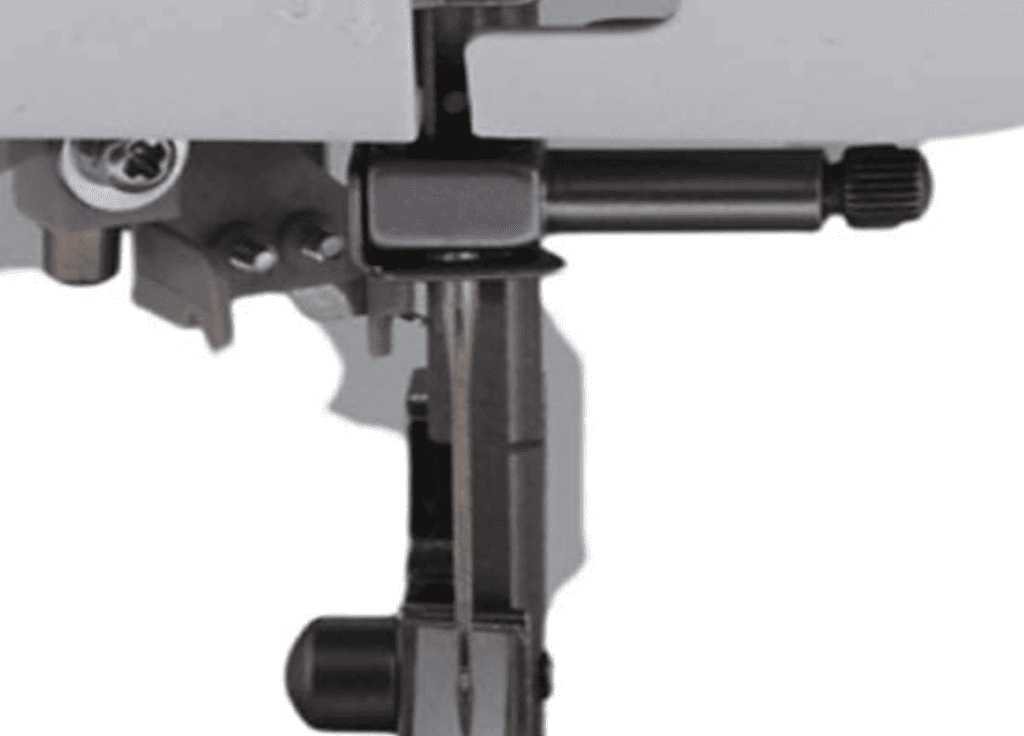
Comparing the needle in a sewing machine to a car’s gas is an apt analogy, as this small yet essential component serves as the driving force behind the entire sewing process.
The needle itself is a slender, pointed metal tool, featuring a tiny eye or hole at one end, through which the thread passes. Despite its seemingly simple appearance, the needle’s role is paramount in achieving accurate and beautiful stitches.
Like the gas that propels a car forward, the needle’s purpose is to propel the thread through the fabric, creating the interconnected loops that form the stitches.
As it swiftly moves up and down, driven by the machine’s mechanism, the needle pierces the fabric, creating a pathway for the thread to weave its way through, seamlessly binding the materials together.
You are doing a great job learning the parts of a sewing machine. You are going to be ready to sew soon.
While every part of the sewing machine contributes to the overall performance, the needle acts as a catalyst that sets the sewing process into motion. It is vital to ensure the needle is securely fastened in place before commencing any sewing project.
A loose or improperly installed needle can lead to skipped stitches, fabric damage, or even potential harm to the machine or the user.
Taking a moment to check and tighten the needle properly is a simple yet crucial step in ensuring a smooth and trouble-free sewing experience.
Before every sewing session, it’s wise to inspect the needle for any signs of wear or damage and replace it as needed.
Using the appropriate needle for the fabric type and sewing technique also enhances the quality of stitches and prevents unnecessary strain on both the needle and the machine.
As you embark on your sewing journey, always remember the significance of this unassuming but indispensable tool—the needle. Its reliable performance and proper care are the keys to unlocking your creative potential and achieving professional-grade sewing results.
Great job learning the parts of a sewing machine. You are going to be ready to sew soon.
Needle Clamp
This component is responsible for securing and stabilizing the needle, ensuring it remains steady and immobile throughout the sewing process. The needle clamp screw is what you tighten to hold your machine needles in place.
It does have a small screw and you want to be careful not to completely take it out when loosening it to replace a needle, as it can be difficult to put back in.
Light Bulb
Lighting near the needle and needle clamp is a standard feature in all sewing machines, serving as a guiding beacon to ensure precise stitching and accurate stitch length. This illumination plays a crucial role in enhancing visibility and reducing eye strain during the sewing process.
Whether you are working on intricate designs or basic seams, a well-lit workspace is vital for achieving professional-looking results.
The strategically placed light near the needle illuminates the fabric area directly under the needle, providing a clear view of the stitches as they form.
This visibility allows you to maintain consistent stitch length and helps you sew in straight lines, ensuring that your creations are not only aesthetically pleasing but also functionally durable.
Over time, if the light bulb in your sewing machine burns out, there’s no need to worry. Thankfully, replacing it is a simple task that requires minimal effort.
You can conveniently obtain replacement bulbs from your local fabric store or online platforms like Amazon, making the process hassle-free.
It’s a good idea to keep a spare light bulb on hand, so you can quickly restore proper lighting and resume your sewing projects without delay. Great job learning the parts of a sewing machine.
Proper lighting in your sewing workspace is essential for accuracy, precision, and overall sewing enjoyment. So, remember to check your sewing machine’s light periodically to ensure it’s functioning optimally.
By maintaining this small but vital aspect of your sewing machine, you’ll set the stage for delightful and successful sewing experiences, bringing your creative visions to life with confidence and ease.
You are doing a great job learning the parts of a sewing machine. You are going to be ready to sew soon.
Needle Plate
The largest plate located at the bottom of the sewing machine serves as a barrier, preventing the fabric from being drawn down into the machine during sewing.
Certain machines come with plates that have measurements inscribed, which can be beneficial for beginners as a visual aid. Additionally, the type of plate may vary depending on the machine, such as front-loading or top-loading machines.
Both types of plates are suitable, and the choice between them mainly depends on individual preferences for perceived convenience.
Bed
The bed of the sewing machine serves as your primary work area. It is the flat section where the feed dog is mounted, providing stability to the machine.
When working on your projects, this is the designated space where you’ll place the fabric and carry out your sewing tasks. If you do get too much fabric under it, you can run into problems, make sure you are consistently moving your fabric when it is finished sewing.
Bobbin Winder
Usually situated at the top-right corner of your sewing machine, the thread winder performs precisely what its name suggests – winding the thread onto the bobbin.
Each bobbin winder also has a bobbin winder stopper that stops the bobbin from winding when the bobbin is full and ready for your next sewing project.
Your machine should have a bobbin winder thread guide in the manual so you can see exactly how to wind your bobbin.
Bobbin
The bobbin is a small spool positioned underneath that holds the lower thread. To create a stitch, the bobbin thread and the needle thread are looped together in a synchronized manner.
Your machine should come with an empty bobbin. I also purchase more on Amazon and fill threads I am using a lot of so that I don’t have to stop and wind more bobbin in the middle of a sewing project.
Each bobbin also has a small hole that you will place your thread through to ensure the thread tension stays consistent while you are winding your bobin.
Bobbin Case
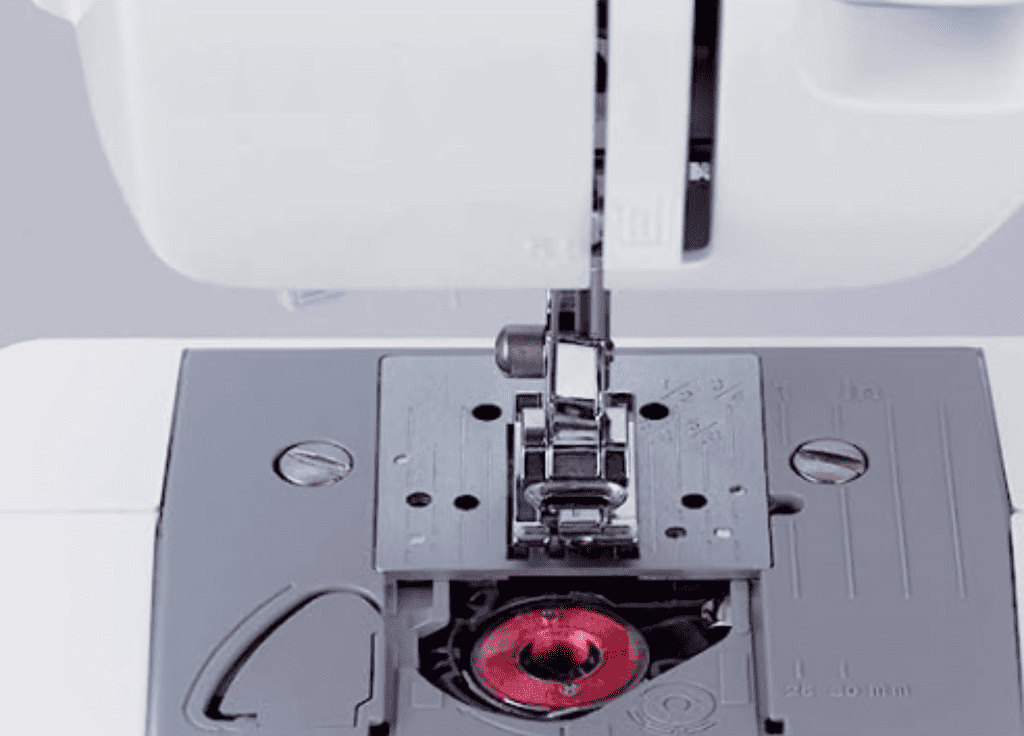
The bobbin case contains the bobbin and provides tension to the lower thread. As the needle thread is pulled around the bobbin case, it intertwines with the bobbin thread and draws it up through the needle plate.
More Parts Of A Sewing Machine
Spool Holder

The spool holder is responsible for securing the spool of the top thread in place at the top of the machine. To prevent the spool from flying off, a cap is used to hold it down securely. You machine may also have a spool pin or only a spool pin and that is where the spool of thread is placed and held so that it stays on.
You will find it on the top right side of the machine. This is just part of learning the parts of a sewing machine.
Slide Plate
The slide plate is a movable rectangle-shaped plate that covers the bobbin case. This essential part enables easy removal of the bobbin case while ensuring the machine remains stable during the process
Hand Wheel
The balance wheel initiates the motion of the sewing machine and is responsible for raising and lowering the needle. It’s essential to know about these parts of a sewing machine.
The motor powers the wheel, but it can also be manually operated by hand to adjust the sewing needle height. Typically, this wheel is positioned on the right side of the sewing machine.
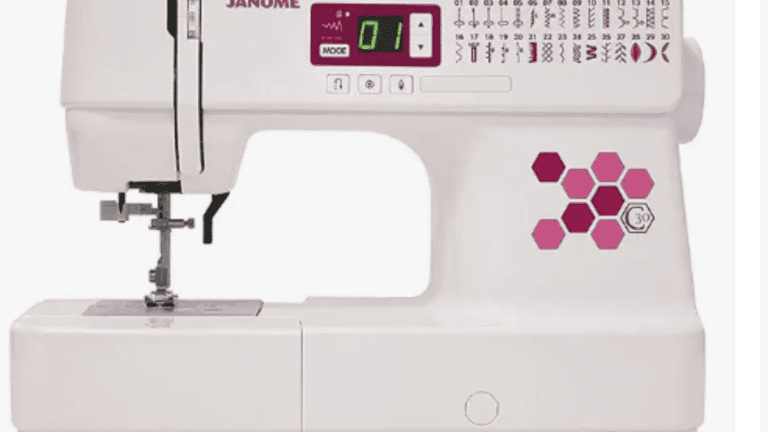
Stitch Selector

This feature allows you to choose the desired stitch type for your sewing. Most sewing machines offer options for straight, zigzag stitch, and embroidery stitches.
Knowing which stitches you need are essential when learning the parts of a sewing machine.
Most of the time you will use a straight stitch, but you may also want to adjust the stitch length dial if you are doing decorative stitches or want to do a baste stitch to see if your project is going to fit.
You always want an even stitch and if you discover stitch issues with different type of stitch, check out our post on Common Stitch Problems.
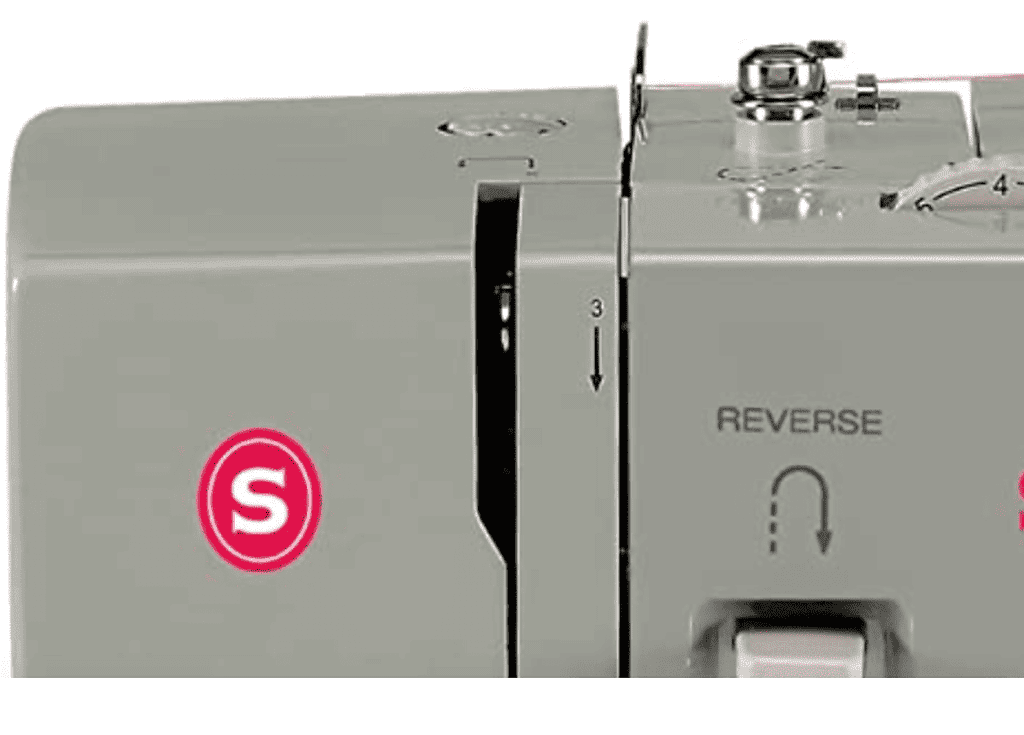
Reverse Lever
The reverse lever permits the machine to move backward or in reverse. This convenient function enables you to navigate to any part of your project as needed. Again, great job in learning the parts of a sewing machine.
Foot Pedal
The speed controller determines the sewing machine’s speed based on the force applied to it. However, in high-speed sewing machines, this component is not essential because the machine’s speed can be easily set with a single adjustment.
Moreover, starting and stopping the sewing machine is effortlessly achieved with the push of a button.
Power Switch
The sewing machine is powered by an electricity-supplying power cord, which must be securely connected to the machine to maintain a constant flow of power. To control the electrical supply, the power switch is used for switching the sewing machine ON and OFF.
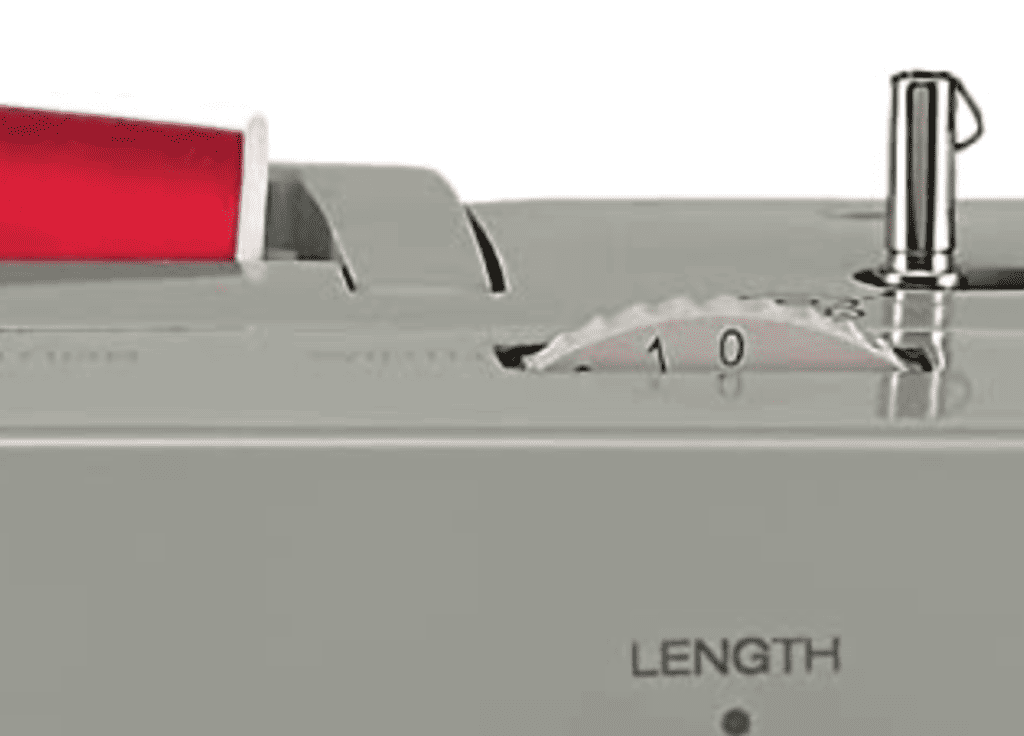
Stitch length adjustment:
Stitch length directly influences the size of the stitches created during sewing. On the machine, you can typically adjust the stitch length within a range from 0 to 4, where 0 represents the shortest stitch and 4 the longest.
The stitch length adjustment occurs at the feed dog rather than the machine needle. When you shorten the stitch length, it reduces the distance the fabric is fed under the presser foot before the needle descends.
Conversely, lengthening the stitch size allows more fabric to be fed under the presser foot before the needle comes down.
Tension Discs
Thread tension is responsible for determining how loose or tight the stitches are when sewing. Tension disks play a crucial role in controlling the pressure applied to the thread, ensuring a consistent feed to the machine needle. The primary functions of the tension device include:
1. Positioning the thread accurately to the needle.
2. Regulating the flow of the thread.
3. Maintaining smoothness in the stitching process.
4. Precisely controlling the passage of the thread.
There are two types of tension devices: direct tension device and indirect tension device. Both types consist of components such as (a) pressure disk, (b) tension spring, (c) thumb nut, (d) tension mounting bar, and (e) pressure releasing unit.
Modern high-speed sewing machines often feature a tension dial with graduated numbers for adjusting the tension.
Higher numbers on the dial indicate greater tension, while lower numbers signify reduced tension. Properly adjusted tension results in a straight and even stitch line on both sides of the fabric.
Thread Take-up Lever
The take-up lever is an integral component of the thread system in a sewing machine, strategically positioned directly above the presser foot.
Its role is crucial in the stitching process, as it plays a dynamic part in creating each stitch. After the needle pierces the fabric and forms a loop, the take-up lever rises to pull the thread back up out of the cloth, securing the stitch and allowing the needle to reset for the next cycle.
This continuous up-and-down motion of the take-up lever is what ensures the proper tension and alignment of the thread during sewing.
It contributes to the overall stability and consistency of the stitches, resulting in clean and even lines throughout your sewing project.
Beyond its primary function in the stitching process, the take-up lever also serves as a valuable gauge for monitoring your needle’s position.
As the lever moves up and down with each stitch, it provides a visual cue of the needle’s current location. This information is particularly useful when you need to stop stitching precisely at a specific point or align the fabric accurately for intricate sewing tasks.
Understanding the role of the take-up lever empowers you to optimize its performance and maintain your sewing machine in top condition.
Regular cleaning and lubrication of this mechanism will ensure smooth operation and prevent any potential issues that could arise from accumulated dust or debris.
With the take-up lever working harmoniously with the rest of your sewing machine, you can embark on your creative sewing endeavors with confidence.
So, the next time you see the take-up lever gracefully moving up and down, appreciate its vital contribution to the art of sewing and the beauty it brings to your crafted creations.
Fabric Giveaway
Enter our monthly fabric giveaway. Simply complete the tasks daily and you will be entered into the drawing. Winner will be randomly drawn on the first day of the month and notified via email