
How to Sew a Hair Scrunchie in 5 Easy Steps
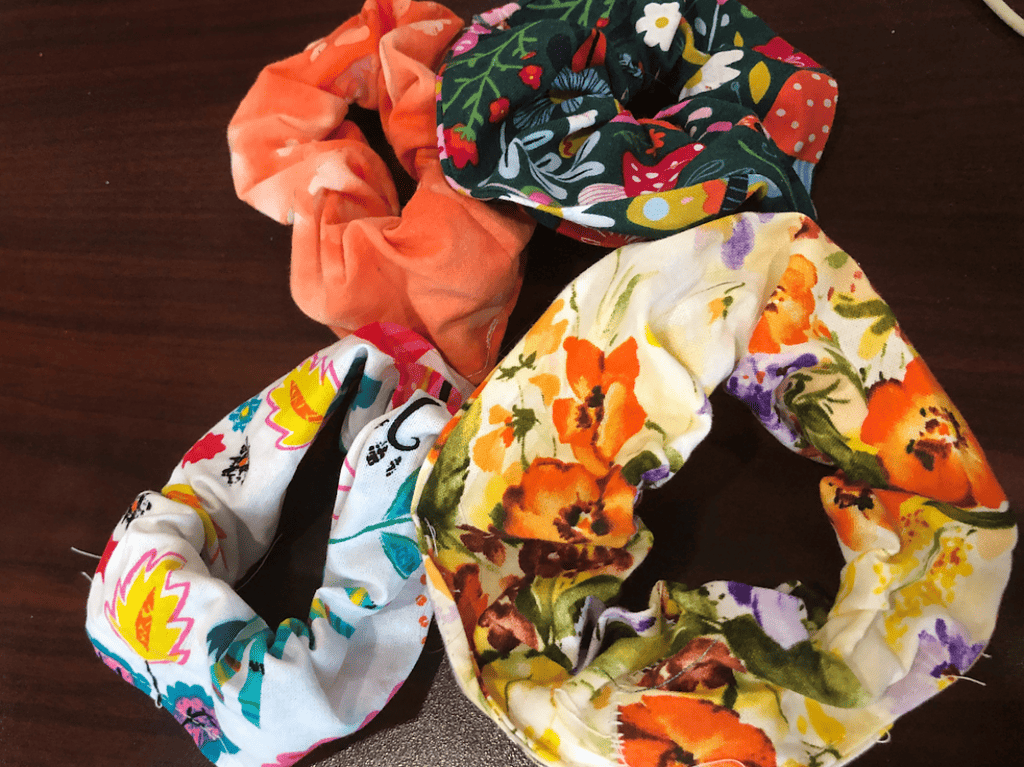
Discover the art of crafting your own professional scrunchie effortlessly using this uncomplicated DIY scrunchie tutorial. Learn how to sew a hair scrunchie by transforming a rectangle of fabric into stylish accessories and surprise your friends with personalized scrunchies using your scrap fabric.
Whether you’re a novice or a seasoned creator, this project is perfect for you. Let’s get started!
Unleash your creativity and upgrade your ponytail game with a professional touch by sewing your very own homemade scrunchies using our complimentary scrunchie pattern.
This pattern provides measurements suitable for both kids and adults, ensuring a perfect fit. Alongside step-by-step instructions on how to sew a hair scrunchie, you’ll find a treasure trove of valuable tips and tricks to make the process even smoother.
Get ready to elevate your hairstyle effortlessly and stylishly! Let’s dive into the world of scrunchie sewing together!
Hair accessories such as scrunchies are not only a breeze to sew, but they also provide an excellent opportunity to put your fabric scraps of a variety of type of fabric to good use.
With minimal fabric requirements, they are the ultimate scrap-buster sewing project teaching you how to sew a hair scrunchie as they don’t take much fabric. Let’s embark on this delightful endeavor of transforming leftover materials into charming hair accessories!
Table of Contents
Supplies you need to learn how to make a scrunchie
Make sure and check out our chart below to see sizes based on age and hair.
- Elastic
- Fat quarter of Cotton Fabric
- Scissors or rotary cutter
- Sewing Machine
- Cutting Mat
- Iron and Ironing Board
Best Elastic for DIY Scrunchies
When it comes to choosing the elastic for your scrunchies, you have a variety of options depending on their intended use.
For hairstyles like top knots that require durability, I suggest using regular braided 1/4″ elastic. This type of elastic is sturdy enough to withstand frequent use and is perfect for hair accessories that will be worn often.
On the other hand, if you plan to wear the scrunchies as wrist accessories, I recommend opting for a softer and more stretchy elastic.
This type of elastic provides a little more flexibility and won’t dig into your wrists as much, ensuring a comfortable fit throughout the day.
Best Fabric for DIY Scrunchie
When it comes to fabric choices for scrunchies, the possibilities are endless. While cotton is a common choice, there are numerous other options to explore when learning how to sew a hair scrunchie:
1. Velvet scrunchies: These are quite popular and add a touch of elegance to any hairstyle.
2. Slippery silk or polyester: While they offer a polished and shiny appearance, they can be a bit challenging to sew with. Additionally, they might slip off your head more easily, so keep that in mind.
3. Jersey knit fabric scrunchies: Though sewing them can be slightly more challenging than non-stretchy fabrics, they provide exceptional comfort when worn.
4. Poplin: This fabric works wonders and can be easily thrown into the washer whenever needed, making it convenient for regular use.
5. Quilting cotton: It’s always a safe choice, with a vast array of colors and prints available. Quilting cotton is versatile, reliable, and offers endless possibilities for customization.
Don’t limit yourself—explore the world of fabrics and discover the perfect material to bring your scrunchie creations to life!
Scrunchie Pattern: Measurements
If you’re looking for additional scrunchie sizes, I’m here to assist you! Here are a few more sizing options as you learn how to sew a hair scrunchie to help you create your perfect scrunchie:
1. Fabric length for ruffles: The length of the fabric determines the number of ruffles on your scrunchie. Experiment with different fabric lengths to achieve your desired ruffle density and style.
2. Elastic length for twisting: The length of the elastic affects how many times you can comfortably twist your DIY scrunchie around your ponytail. Adjust the elastic length based on your hair thickness and the desired snugness of the scrunchie.
Here’s a list of sizing options that have worked well for me:
– For a fuller ruffled scrunchie, try a longer fabric length (e.g., 22 inches) and a slightly shorter elastic length (e.g., 8 inches).
– For a less ruffled look, opt for a shorter fabric length (e.g., 18 inches) and a longer elastic length (e.g., 10 inches).
– If you prefer a medium ruffle density, go for a fabric length of around 20 inches and an elastic length of 9 inches.
Feel free to experiment with these suggestions and adjust the measurements according to your personal preferences. No doubt you can make your own scrunchies!
How to Sew a Hair Scrunchie
Cut your fabric
Begin by cutting a rectangular piece of fabric measuring 18 inches by 5 inches (or 46 centimeters by 13 centimeters).
This will serve as the main body of your scrunchie. Additionally, cut a strip of elastic that is approximately 1/4 inch wide (or 1 centimeter) and no longer than 10 inches (or 15 centimeters) in length. Keep in mind that the elastic is not pictured in the tutorial for how to sew a hair scrunchie.
If you’re interested in making a smaller, kid-sized scrunchie, follow these measurements: Cut a piece of fabric that measures 14 inches by 3 inches (or 35 centimeters by 8 centimeters), and use a 5-inch (or 13-centimeter) long elastic. These dimensions will create a perfectly sized scrunchie for children.
For more scrunchie sizes, refer to the sizing chart provided below:
- Small scrunchie (kid-sized): 14″ by 3″ (35 x 8 cm) fabric, 5″ (13 cm) elastic
- Regular scrunchie: 18″ by 5″ (46 x 13 cm) fabric, 6″ (15 cm) elastic (max length)
- Large oversized jumbo scrunchies: 22″ by 6″ (56 x 15 cm) fabric, 7″ (18 cm) elastic (max length)
Feel free to adjust the measurements based on your preference and hair thickness. If you have super fine hair, you might want to use wide elastic. I found I liked an 8″ scrunchie better for my fine hair.
As you can see, you now have different ways to create scrunchies of different sizes to suit your needs!
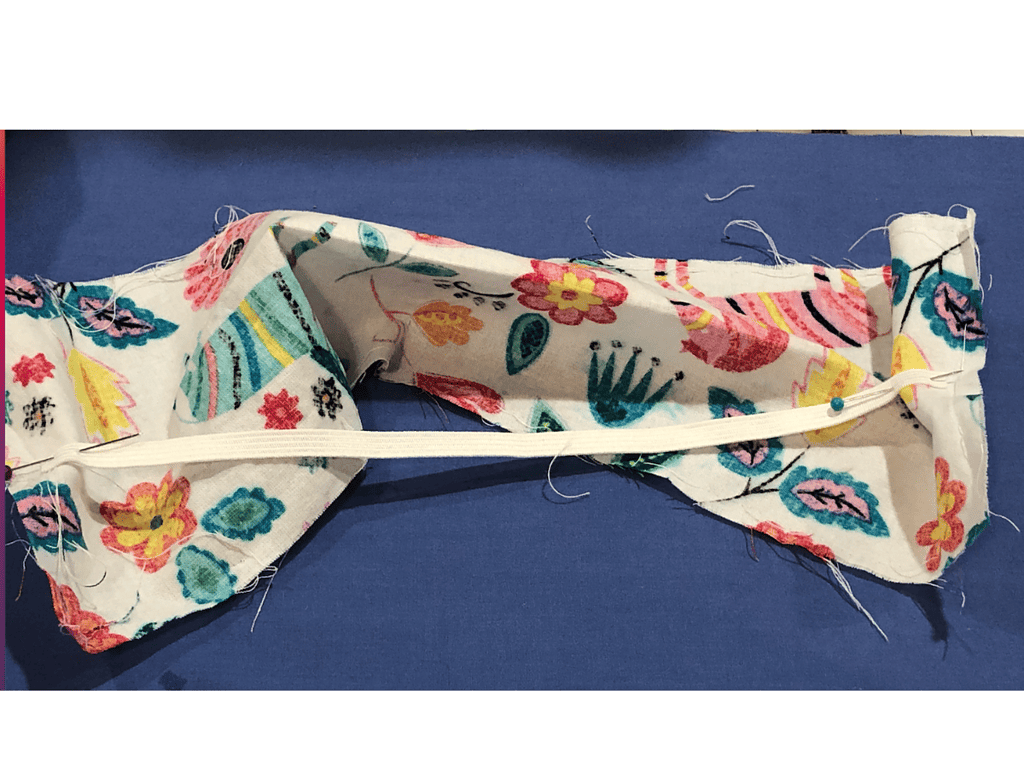
Sew Your Elastic to Your Short Edges
Step 1 of learning how to sew a hair scrunchie is to take your elastic and sew it at the short edges making sure to back stitch to hold it in place. It will bunch in the middle, and that is normal.
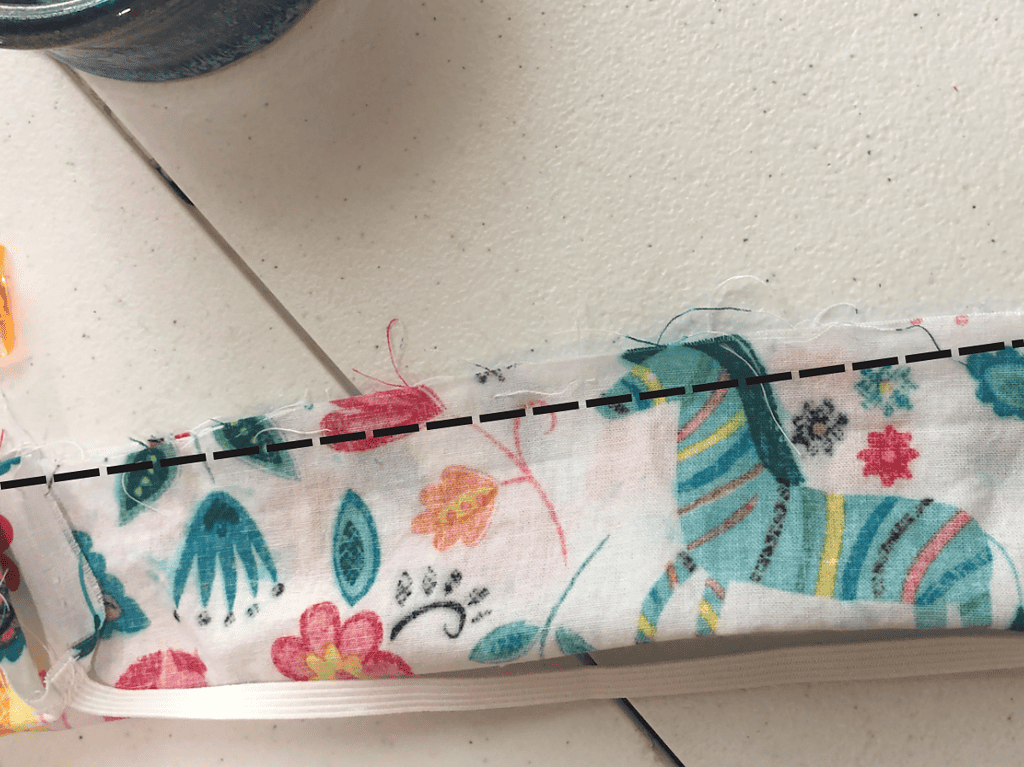
Create a Tube
The 2nd step to learning how to sew a hair scrunchie is to fold the fabric lengthwise with the right sides together, aligning the edges. Stitch along the long edge, using a seam allowance of ¼ inch, and leave a 2″ gap at the top and bottom.
You can either use a sewing machine or, if you prefer, handstitch the fabric together.
As kids, we often used a simple running stitch, which worked perfectly for this step. Choose the method that suits you best and secure the seam.
Turn Right Sides Out
It’s amazing how quickly we’re progressing through the scrunchie-making instructions! We’re now at the halfway point. Let’s move on to the next step: turning the fabric tube right side out.
Carefully push the fabric through the tube, gently guiding it until the entire tube is flipped to the right side. Take your time to ensure a smooth and even transition. Once completed, you’ll have the fabric in its proper orientation for the final steps of creating your scrunchie.
Here’s a helpful tip: If you find that the fabric tube is too narrow to turn with your fingers alone, don’t worry!
The best way to help you is to use a chopstick or a safety pin to assist you.
After successfully turning the fabric right side out of your strip of fabric, it’s time to give it a nice press.
Grab your iron and gently press along the length of the fabric, smoothing out any wrinkles or creases. This step will give your scrunchie a polished and professional appearance, ensuring that it looks its best when worn.
Close your Ends
Next, close the opening by bringing together the two ends of the fabric tube. Align them neatly and stitch them together, either by hand or using a sewing machine, ensuring a secure and tidy closure. Take your time to make the stitching as invisible as possible, maintaining the overall aesthetic of the scrunchie.

With this step completed, your scrunchie is nearly finished! Just a few more steps to go.
Now, it’s time to close the opening of the scrunchie. You have a couple of options to choose from:
1. The fastest method is using a sewing machine with a straight stitch. Simply stitch through all the layers. This will secure the opening quickly and efficiently.
2. If you have more time and prefer a hand-sewn finish, you can hand-stitch all the way around the opening. You can use a running stitch, where you pass the needle in and out of the fabric in a straight line, or a ladder stitch, which creates a nearly invisible seam.
Remember as you learn how to sew a hair scrunchie to take your time and ensure your stitches are secure and evenly spaced.
Choose the method that suits your preference and available time. Both options will provide a satisfactory closure for your scrunchie.
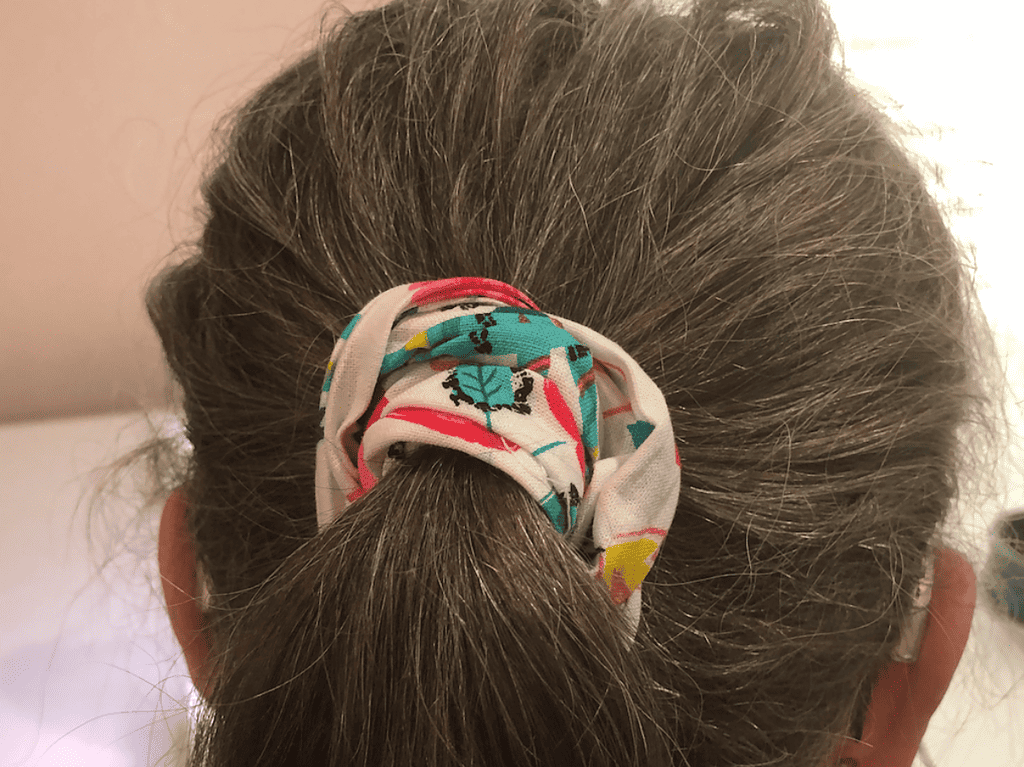
With the opening closed, your scrunchie is now complete and ready to be worn with style! You have learned how to sew a hair scrunchie.
FAQ’s About How to Sew a Hair Scrunchie
Best Elastic for Thicker Hair?
For those with thicker hair, it’s advisable to use a longer piece of elastic to ensure a comfortable fit. Instead of the standard 6-inch length for an adult scrunchie, I recommend adding an extra 2 inches.
By doing so, you’ll have enough elastic to twist the scrunchie around your ponytail twice. So, when cutting the elastic, make it 8 inches in length. This adjustment will accommodate thicker hair and allow for a secure and stylish look when wearing your scrunchie.
Best Sizes for Scrunchies?
Certainly! Here are a few more sizing options to expand your range of scrunchie choices:
1. For a fuller, more ruffled scrunchie, use a longer fabric length (e.g., 22 inches) and a slightly shorter elastic length (e.g., 7 inches).
2. If you prefer a medium ruffle density, try a fabric length of around 18 inches and an elastic length of 6 inches.
3. For a less ruffled look, opt for a shorter fabric length (e.g., 14 inches) and a longer elastic length (e.g., 9 inches).
Remember, the fabric length determines the number of ruffles, while the elastic length affects how many times you can twist the scrunchie around your ponytail comfortably.
Feel free to experiment with these suggestions and adjust the measurements based on your personal preferences and hair thickness. With these additional sizing options, you’ll be able to create the perfect scrunchie for any occasion!
Hair scrunchies are a superior choice for your hair compared to a regular hair tie. They alleviate the discomfort of prolonged high ponytails, ensuring your head won’t ache even after hours of wear. Such a great reason to learn how to sew a hair scrunchie.
Unlike rubber hair bands, DIY scrunchies won’t cause hair breakage, making them a healthier option. These accessories provide both comfort and fun!
Not only are scrunchies quick and easy to make, but they also make fantastic stocking stuffers.
Now that you’ve mastered how to sew a hair scrunchie, go ahead and create an abundance of them. You will find the free sewing pattern in the library
Scrunchies from Amazon
If you are in desperate need of hair scrunchies and don’t have fabric, here are some you can purchase from Amazon, and they with free shipping with a Prime account.
Pink Scrunchies
These pink scrunchies are perfect for every girly girl.
Silk Scrunchies
Silk scrunchies are amazing because they keep your hair from getting any lines and are great if you wear your hair up at night.
80’s Scrunchies
Who didn’t love the 80’s? These 80’s scrunchies will take you back to your childhood.
Velvet Scrunchies
I love velvet scrunchies as they are super comfy and don’t pull your hair
Satin Scrunchies
Satin scrunchies are perfect for thick hair. Holds your ponytail without lines or creases.
It may also be cheaper to buy hair scrunchies than to make them, but we do love to sew scrunchies.
Other Sewing Resources:
If you are new to sewing, we recommend that you start by learning the basics and starting with a simple project like the potholder.
Start with:
Fabric Giveaway
Enter our monthly fabric giveaway. Simply complete the tasks daily and you will be entered into the drawing. Winner will be randomly drawn on the first day of the month and notified via email

2 Comments